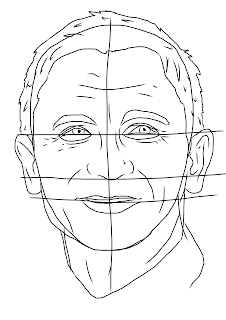
The first session of this years Art Club was on Portraits.
For those of you that want a reminder or those of you that are looking at the site and were not present at the session, here are the steps to drawing a face on portrait (The easiest way to draw someones face)
You could just make up a face but it works best if you draw from reference. I would suggest a friend or family member, however if not then get a photo of somebody's face.
I chose Daniel Craig:
Step 1
Draw the rough shape of the persons head and the neck.
Step 2
Then lightly draw the guidelines.
The first is roughly halfway across the middle of the head.
The second is roughly halfway between the first and the chin.
The third is roughly halfway between the second line and chin.
The fourth splits the face in two vertically.
Now everyone's head is different and not everyone's heads obey these rules, however it is a good place to start.
Step 3
Now draw in the basic shapes of the face. Don't panic! It really isn't that complicated.
- Draw the eyes equally apart from the middle line, with the eyebrows just above.
- The nose goes from the eye line to the line below.
- Next the lips sit on the line between the chin and nose.
- Then finally the ears go from the eye line all the way to the lip line. (I know this may seem excessive but it is true, look in the mirror)
Step 4
Now for the basic detail!
Take a close look at the person/picture you are using for reference.
- Correct the shapes of the head, chin and neck.
- Improve the eye shape making them look more human and less cartoon-like, people have eyelids.
- Add the lip detail and shape.
- Look at the nose and ears and change them if you need to.
- Thicken the eyebrows
- Add Hair
- Add any important features, creases, scars, etc.
Step 5
After that we now need to add, little details!
Here you add any other details you see: prominent hair, creases, wrinkles
Just be careful not to add too many, Mum will not approve!
Step 6
Time to add shading.
Rub out your guidelines first now that we are done with shape.
With line art try to avoid scribbling, just draw parallel lines closely next to each other in the darkest patches. This will make certain areas stand out more, giving the picture more depth.
Cross hatching will be covered at a later date, let us keep it simple for now.
Step 7
Finally keep adding shading and detail until you are happy.
There is such a thing as too much detail and shading but don't let that hold you back, experiment and have fun!


No comments:
Post a Comment